
Pre-Bowing Excercises
From Dakon, J. M. (2014). Exploring pre-bowing exercises: The search for a definition and its application.
American String Teacher, 64(1),34-37.
Revised in July 2016
American String Teacher, 64(1),34-37.
Revised in July 2016
What are Pre-Bowing Exercises?
Pre-bowing exercises are a logical sequence of right-hand activities that follow bow-hand shape exercises and bow-directional understanding, and prepare the simple-connected détaché bow stroke. They are frequently performed with a bow or bow-like apparatus away from the instrument, but may involve the instrument toward the later stages of pre-bowing development (Dakon, 2014).
The figure below indicates where pre-bowing exercises fall within the larger curricular sequence. As the arrows suggest, bow-hand shape, pre-bowing exercises, and détaché (simple connected) bow stroke are reviewed constantly throughout the first and second year of instruction. More information on how this definition was constructed, see Dakon (2014).
The figure below indicates where pre-bowing exercises fall within the larger curricular sequence. As the arrows suggest, bow-hand shape, pre-bowing exercises, and détaché (simple connected) bow stroke are reviewed constantly throughout the first and second year of instruction. More information on how this definition was constructed, see Dakon (2014).

Why Pre-Bowing Exercises?
Pre-bowing exercises train the right hand and arm away from the left hand and instrument, which has been referred to as the 'divide and-conquer' principle (Allen, 2003; Kjelland, 1987). In order to 'conquer' inherent coordination issues associated with fundamental skills, like body format, left-, and right-hand skills, string teachers should 'divide' each set into manageable units. Once each unit is developed in isolation, the instructor can then gradually combine them in a systematic way. Pre-bowing uses the 'divide-and-conquer' principle to prepare young string players for the simple-connected détaché stroke. For a more thorough rational, see Dakon (2014).
Instructional Sequence (Dakon, 2014)
Step 1: Review the Bow-hand Shape
First and foremost, ensure students maintain a reasonably correct and relaxed bow-hold shape prior to beginning pre-bowing exercises. I say 'reasonably,' because it is idealistic to assume that every child will have a perfect bow-hand shape before starting pre-bowing exercises. It, however, is far more likely that pre-bowing exercises will contribute to the development of each child's bow-hand shape. That being said, I cannot emphasize the importance this requisite enough. No student should pass through beginning-level instruction with an improper bow-hand shape. Poor execution of this most basic skill will inevitably and severely hinder their success for the remainder of their career if not corrected. For a more thorough discussion of bow-hand shape development, see Hamann and Gillespie (2013), Galamian (1987), or Fischer (1997).
Step 2: Joint Actions
Next, teach students to release the requisite joints in the shoulder, elbow, wrist and fingers. Do not assume all children are limber and relaxed. I assure you, this is not the case. Furthermore, any excessive tension around the innermost joints, such as the shoulder, can severely impact the mobility of outermost joints located in the elbow, wrist and fingers. To counteract this tension, engage children in motion-based activities, or what Paul Rolland refers to as “action.” I suggest the following strategies:
|
Shoulder Hang:
To relax the muscles in the shoulder, ask students to stand up and bend over at the waist. Hang the arms down to the floor, and allow them to swing freely in a relaxed manner. Take a mental picture of how free and relaxed their arms feel. This is what it feels like to move the bow. Opening/Closing the Door:
This is a 'tried and true' exercise to relax the muscles surrounding the elbow joint. Ask students to place their left-hand index finger into the pit of their elbow (this reminds students to keep their upper arm still). Using the index finger as a fulcrum, swing the forearm toward the body. This is called flexion motion. Now, swing the elbow away from the body. This is called an extension motion. This action resembles the swinging action of a door as it opens and closes. Take a mental picture of how free and relaxed the arm feels. Jellyfish: To relax the muscles in surrounding the wrist and finger joints, ask students to hold their right hand in front of the body in a relaxed manner. Pulse the wrist in an upward motion with the wrist, allowing the arm, hand, and fingers to move freely through space. The hand and fingers should react to the pulse as if they were tentacles of a jellyfish swimming through space. Take a mental picture of how this feels.
|
Step 3: Détaché Simulation Strategies
The purpose of this step is to break down the simple-connected détaché stroke into several smaller motions away from the instrument. I do this to separate right- and left-hand technique during the earliest stages of instruction, which then enables students to focus their entire attention on the task-at hand, which in this case is the bow-arm motion. Again, for more information on this topic, see Allen (1994, 2003) and Kjelland (1987). These strategies should be implemented in a purposeful sequence, so that each strategy builds off of the other.
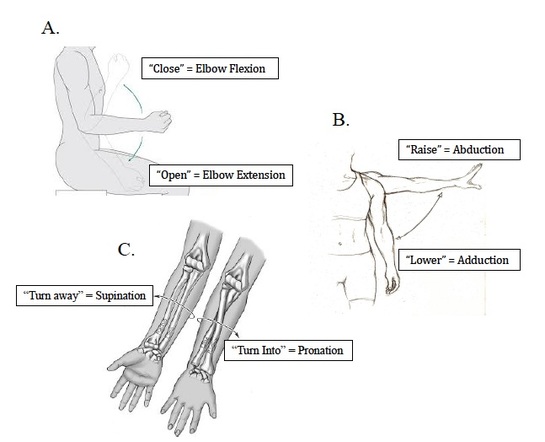
Before moving on, let's review the motions required of the simple-connected détaché stroke. All four string instruments use these three movements.
Violins and violins begin simple-connected détaché by extending and flexing the elbow joint, while the upper arm remains relatively still and relaxed. During these motions, allow the elbow to react by slightly abducting (rising) and adducting (falling) from the shoulder joint. Finally, pronation of the forearm occurs as students bow downward, thereby engaging the index finger into the bow stick. During the upward motion of the bow, the forearm then supinates back to its original position. For more on this motion, see Galamian (1984) and Fischer (1997).
The cello and bass motions (French style) are fairly similar to the upper strings, but occur on a different plane and in reversed order. From the lower half of the bow, the downward stroke begins with a slight abduction of the shoulder joint. After pulling the bow a couple of inches, the abduction movement ceases naturally and the forearm extension become the primary motion. During the extension, the forearm also pronates into the bow as the performer reaches the tip of the bow. During the upward motion, the forearm flexes until the performer reaches the lower half of the bow. Then shoulder joint adducts until the performer reaches the frog. The shoulder and elbow should be relaxed upon arriving at the lower half of the bow. On bass, the elbow motions are less pronounced, while the shoulder motions are more pronounced.
The Strategies:
Teach each of these simple-connected détaché movements in isolation from the others, and then gradually combined them until students can simulate a smooth stroke away from the instrument. I recommend the following strategies, but first, you will need a couple supplies:
Before moving on, let's review the motions required of the simple-connected détaché stroke. All four string instruments use these three movements.
- The extension (opening) and flexion (closing) motions in the elbow joint (see example A)
- A slight abduction (raising) and adduction (lowering) the shoulder joint (see example B); and
- Pronation (inward rotation) and supination (outward rotation) of the forearm (see example C).
Violins and violins begin simple-connected détaché by extending and flexing the elbow joint, while the upper arm remains relatively still and relaxed. During these motions, allow the elbow to react by slightly abducting (rising) and adducting (falling) from the shoulder joint. Finally, pronation of the forearm occurs as students bow downward, thereby engaging the index finger into the bow stick. During the upward motion of the bow, the forearm then supinates back to its original position. For more on this motion, see Galamian (1984) and Fischer (1997).
The cello and bass motions (French style) are fairly similar to the upper strings, but occur on a different plane and in reversed order. From the lower half of the bow, the downward stroke begins with a slight abduction of the shoulder joint. After pulling the bow a couple of inches, the abduction movement ceases naturally and the forearm extension become the primary motion. During the extension, the forearm also pronates into the bow as the performer reaches the tip of the bow. During the upward motion, the forearm flexes until the performer reaches the lower half of the bow. Then shoulder joint adducts until the performer reaches the frog. The shoulder and elbow should be relaxed upon arriving at the lower half of the bow. On bass, the elbow motions are less pronounced, while the shoulder motions are more pronounced.
The Strategies:
Teach each of these simple-connected détaché movements in isolation from the others, and then gradually combined them until students can simulate a smooth stroke away from the instrument. I recommend the following strategies, but first, you will need a couple supplies:
- Wooden yardstick
- Wooden dowel rods: Cut into lengths that approximate the length of a bow
- Straws or unsharpened pencils: Starbucks and McDonald straws work best given their thickness.
- Toilet paper tubes or PVC pipe: Purchased at any home improvement store (w/ dowel rods). Cut the pipe into 6-inch sections (about the length of a toilet-paper roll). Buy the thinnest pipe available to keep it light weight, and make sure it fits a bass bow (with a little shove).
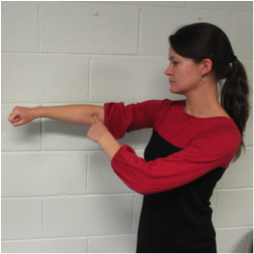
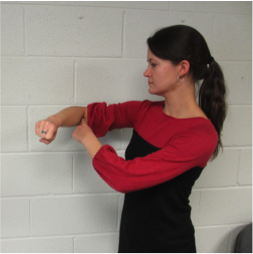
Review Opening/Closing the Door
Focus: Flexion and Extension of the elbow joint.
Focus: Flexion and Extension of the elbow joint.
|
|
|
Extension
|
Flexion
|
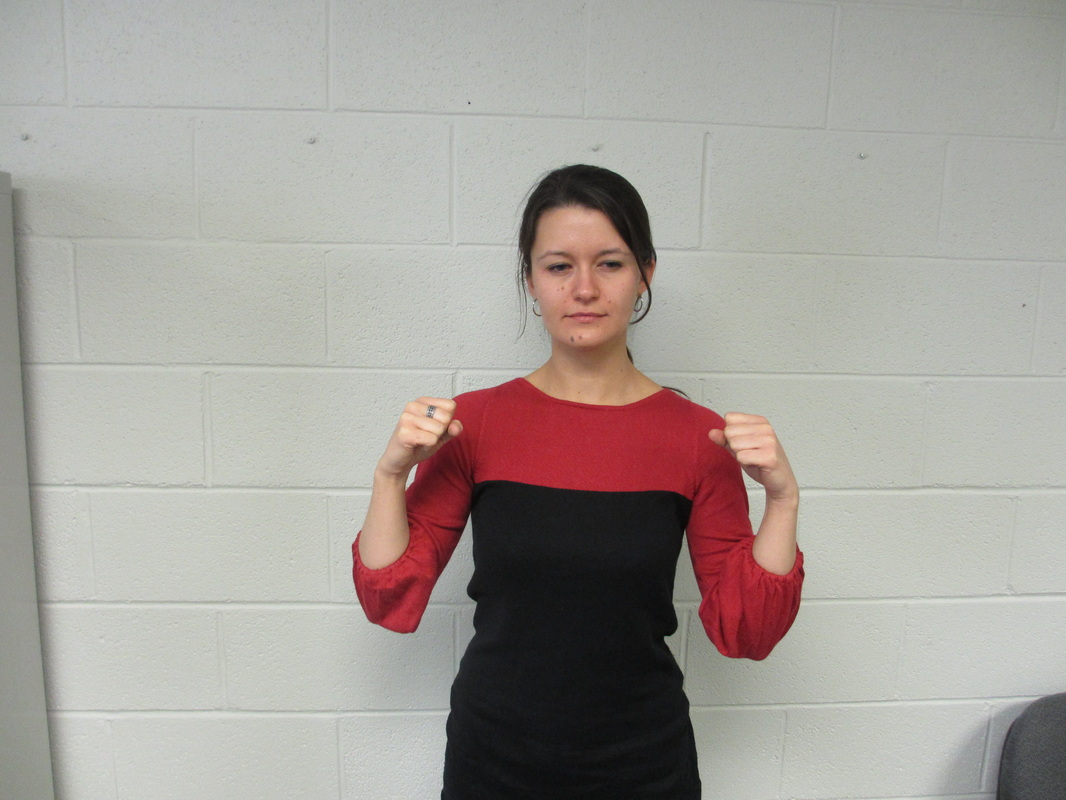
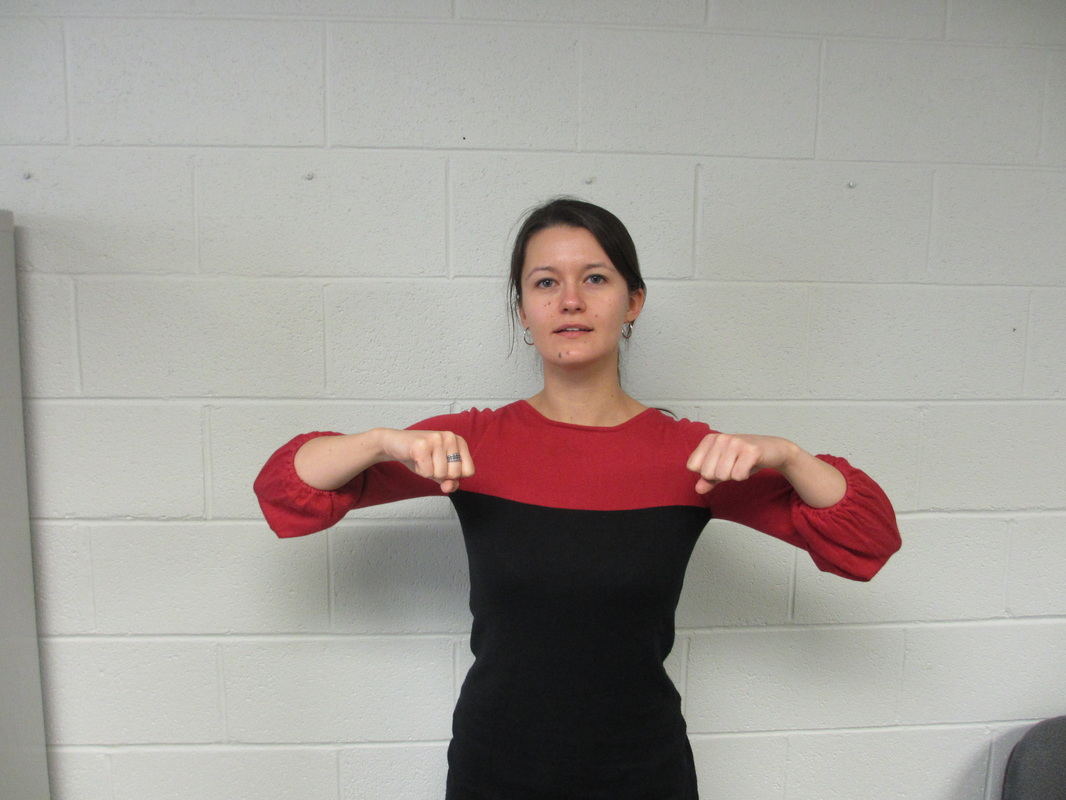
Chicken Wings:
Focus: Abduction and Adduction
Ask students to “flap their chicken wings.” Note the relaxed and free abduction and adduction of their shoulder joints.
Focus: Abduction and Adduction
Ask students to “flap their chicken wings.” Note the relaxed and free abduction and adduction of their shoulder joints.
|
|
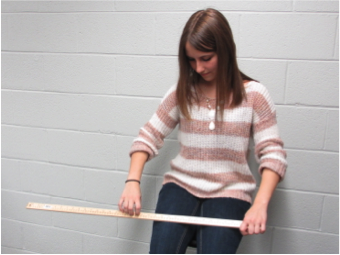
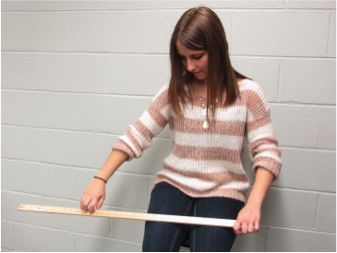
Traveling Down the Road: (Hamann & Gillespie, 2013, p. 61)
Focus: Each stage of the cello and bass bow-arm motion, either apart or together.
While seated, have students place a yardstick in their lap with the left edge of the yardstick over the left knee. Stabilize the yardstick's left edge with the left hand and hang the remainder of the stick over the right side of the right knee. Place the tips of the right-hand fingers on top of the yardstick. Brush the fingers along the right side of the stick. Ensure students’ shoulder and elbow joints are moving properly. Say “out, open, close, in” with each motion of the stroke. Isolate each motion and allow time for memorization. Then perform the motion together in a smooth, seamless manner with the metronome. Basses use a similar sequence of motions to perform détaché, but the range of motion is less than that of the cello.
|

|
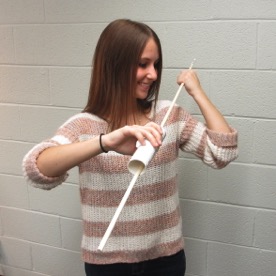
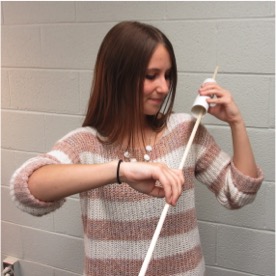
Tubing It (Hamann & Gillespie, 2013, p. 60) Focus: Each stage of the each instruments bow-arm motion, either apart or together. Hold the dowel over the left shoulder (violin/viola) or in front of the body (cello/bass) with your left hand. Form a bow-hand shape on PVC tube. Place the dowel through the tube. Move the tube no more than 3-4 inches across the dowel during initial instruction. Expand length of stroke as needed. The dowel helps students visualize and feel how to move the bow in a straight line. |
|
Shadow Bowing with a Tube (Rolland et al., 2000, p. 85) Focus: Each stage of the each instruments bow-arm motion, either apart or together with the bow or dowel. Hold the tube over the left shoulder (violin/viola) or in front of the body (cello/bass) with the left hand. Form a bow-hand shape at the balance point of the bow. Place the tip of the bow through the tube. Move bow no more than 3-4 inches through the tube during initial instruction. Expand length of stroke as needed. Students have the opportunity to practice the détaché motion with the bow. |
|
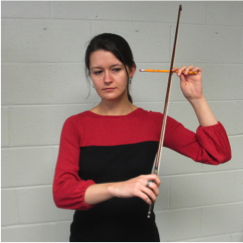
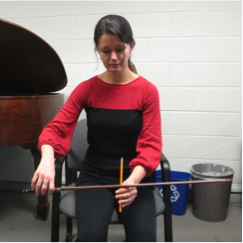
Pencil or Straw in the Bow
Focus: Practice the détaché motion in a freer bowing environment with the bow
Hold the bow at the balance point or at the frog with the right hand, depending on students’ level of experience. Violinists/Violists: Hold the pencil or straw in the left hand. Pretend as though you were going to insert a pencil into your left ear (obviously, DON'T). Place the bow over the left shoulder and insert the pencil between the stick and the hair. Practice the détaché motion. Cellist/Bassist: Hold a pencil at waist level with the left hand and point the tip toward the ceiling. Hold the bow in playing position in front of the body. Insert the pencil between the hair and the bow stick with the hair facing the body. Practice the détaché motions.
|
|
|
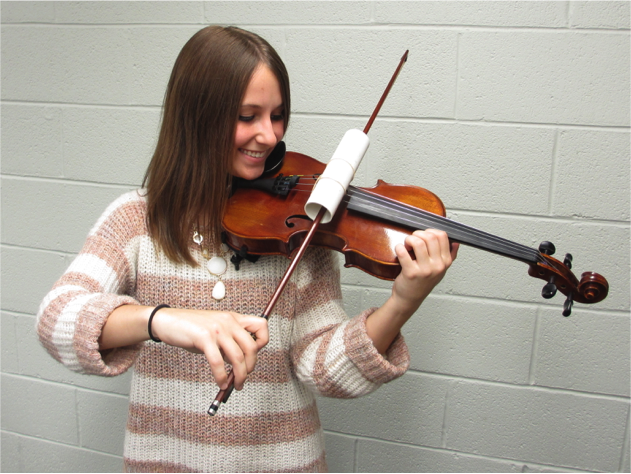
Instrument Tubing (Hamann & Gillespie, 2013, p. 60)
Focus: This strategy merges left- and righthand technique in preparation for the détaché stroke without bowing across the strings. To attach the tube to the instrument, “place the rubber band under the strings, and position the tube on top of the strings. Loop the ends of the rubber band around the ends of the tube to fasten the tube to the strings. The tube should sit between the end of the fingerboard and the bridge” (p. 60). Don't worry. In all the years I have done this, no instrument has ever been damaged. Once the tube is attached, place the instrument in playing position. Insert the bow into the tube and practice the détaché motion. |
Concluding Thoughts
From the onset of instruction, developing proper bowing technique is essential to the success of any young string musician. The complex array of skills associated with simple-connected détaché, therefore, must be introduced carefully and gradually away from the instrument before applying the bow to the string. Rushing students to this step, while stimulating, is ultimately maladaptive in that it threatens to undo all previously learned skill sets (e.g., left-hand and body posture). These pre-bowing exercises offer teachers a fun and exciting process that can help students properly implement the simple-connected détaché stroke from the start.
This article contains only a few suggestions of strategies. For others, see the works of Phyllis Young, Paul Rolland, Simon Fischer, Don Hamann, Robert Gillespie and other string pedagogues.
Please feel free to leave constructive comments below. A special thanks to Dr. Veronique Mathieu and Haley Grant for modeling the strategies.
Citations:
Allen, M. L. (1994). Introducing and integrating basic skills in the beginning string class. American String Teacher, 44(3), 69-72.
Allen, M. L. (2003). A pedagogical model for beginning string class instruction: Revisited. In D. Litrell (Ed.), Teaching music through performance in orchestra, Vol. 3 (pp. 3-13). Chicago, IL: GIA Publications.
Dakon, J. M. (2014). Exploring pre-bowing exercises: The search for a definition and its application. American String Teacher, 64(1),34-37.
Hamann, D. L., & Gillespie, R. A. (2013). Strategies for teaching string orchestra: Building a successful string and orchestra program, 3rd ed. New York, NY: Oxford University Press.
Kjelland, J. (1987). String-O-Phobia: Some Causes and Cures. American String Teacher, 37(2), 70-74.
Rolland, P. & Mutschler, M. (2000). The Teaching of Action in String Playing. Reston, VA: The American String Teachers Association.
Watkins. C. (2008). Rosindust: Teaching, Learning, and Life from a Cellist’s Perspective. Houston, TX: Rosindust Publishing.
